Colormath Basics for Shaders
This article is meant to provide some basic technical insight into the math and the general way of thinking when creating and working with shaders; be it node-based or with code.
RGB Color model
The most common color model used on a computer, is the RGB model. Wikipedia defines it as following:
The RGB color model is an additive color model in which red, green, and blue light are added together in various ways to reproduce a broad array of colors.
In RGB, colors are represented by their Red, Green and Blue values, grouped together in a vector 3. The accuracy at which color ranges are displayed, depends on the way they are stored. On modern computers this is 24bits per pixel (bpp), 8bit per channel. That means in an image file each R, G and B value can be within the range of 0-255, since this is the amount of data a bit can store. With this 24bpp model, called “TrueColor” you can display up to 16.7million colors (256x256x256). When translating this into a shader, you get higher accuracy since you can use a 0 to 1 range floating point accuracy (so a lot more than 255 steps per channel). The final translation to what is shown on screen, is something you don’t have to worry about and is all done for you by the hardware.
Grayscale is also an important element when working in shaders, since you will use colors and grayscale together a lot. Grayscale values can be represented by a vector3 with RGB values, but this is not necessary since every channel will be the same. A single float value (scalar) is enough to store a grayscale value.
High – Low Dynamic Ranges
The range of these color values is mostly supposed to be within 0-1 floating point accuracy, which means they are Low Dynamic Range (LDR) and their values don’t correspond to real world luminances (see this as light strength/brightness). Simplest way to explain is to imagine an image of both a bright lightsource, and a solid white object. On an LDR representation, the lightsource and the white object will mostly have the same white color values, but this doesn’t mean they have the same luminance values. A High Dynamic Range representation of the image has a higher range than the standard 0-1 and thus contains the correct luminances. A shader’s final output to the computer screen will always be LDR because of the nature of computer screens today, but that does not mean you should not be aware of these luminance ranges when doing your computations. Even the simplest colormath calculations require you to keep these ranges in the back of your head.
High Dynamic Range Rendering
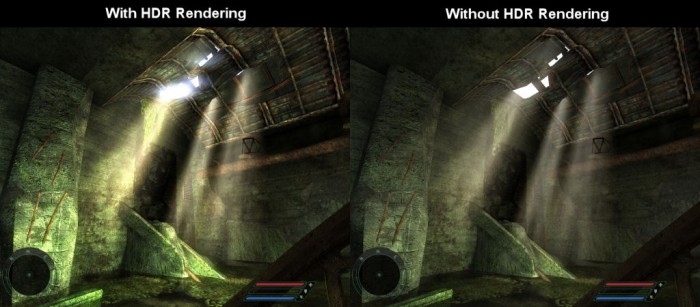
It will frequently happen however that your calculations result in colors outside of the 0-1 range. If you would show the final result of such a calculation on your screen, it would look as if the channel that contains a value higher than 1, is equal to 1. So displaying RGB(1,1,1) next to RGB(2,2,2) would look exactly equal on screen, the color ranges are just limited by the hardware. The reason you can work with these higher, unlimited values is because you might want to perform luminance-specific operations. For example: a glow post-effect should be stronger and brighter on pixels with a higher luminance (see Far Cry example), or you might want to perform a tone-mapping post effect that adjusts your entire color range depending on the luminance of all the pixels in the image (imagine this like your eyes adjusting to bright light outside after coming from a dark room inside).
The higher range of intensities clearly makes the image more vivid thanks to better post-processing.
Basic Operations
Now that you have some insight into the basic ingredients of colormath, I can explain the basic math principles. Keep in mind that RGB is additive, so higher values are brighter colors. There are 3 basic operations you can do with colors in regard to shaders. Addition/substraction, Multiplication/division, and Power. I will go over each of these operations
Addition/substraction.
These simple images illustrate the basic working of this operation. Each respective channel gets added together, or a scalar gets added to every separate channel, always adjusting brightness, and also color in the case of adding vectors.
When working with shaders it is very important to keep in mind that you are never doing operations for a single pixel, but rather for every pixel on the surface of your object or rendertarget. The following image illustrates the effects of addition when working with ranges.
This image represents the result of adding a specular highlight to a solid red color. Black values don’t influence the color, whiter values increase brightness.
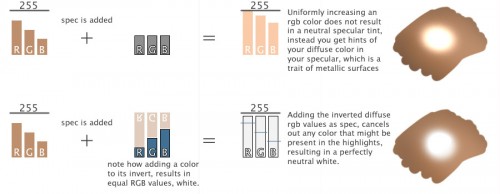
A bit more of an advanced topic regarding addition, is the use of blue specular for skintones. It’s not specifically about the blue, but more about using the invert of the diffuse as specular value. The following image illustrates why:
Multiplication/Division
These images illustrate some color multiplications. Each respective channel is multiplied with each other, or in case of a scalar, each channel is multiplied with the scalar value. The first example is multiplied by 10 to compensate the much lower brightness. The second one is multiplied by a scalar to adjust the brightness, resulting in a very dark red. Multiplying with a scalar larger than 1 results in a brighter red. Multiplication can be used to mix colors and adjust brightness.
Following examples illustrate multiplication with ranges of colors instead of solids.
 Multiplication can be used to color a grayscale range, where the grayscale darkens the brightness of the solid color.
Multiplying color ranges with high scalar values can result in interesting color variations. Very important here is the small green value in the base color range. Without this value, the yellow tint would never appear, since you would just be multiplying 20 with zero in the green channel.
Power
Powering color values is an operation which result is not very obvious when used on solid color values, since it will almost look the same as multiplying. The effect becomes a lot more obvious when used on ranges of colors. Powering rescales the range of colors, but you can consider it as a sort of contrast adjustment operation (NOT the same as in Photoshop however).
Examples performed on a radial gradient:
Powering to high values sharpens our range, similar to increasing the glossiness on a specular highlight
Powering to fractions (this is actually a square root) widens the range of the scalar. Note that interestingly, if you power to very small fractions, the 24bpp stepping of our monitors is not able to show the small gradient anymore, resulting in a hard edge.
Special Blending
You might be familiar with the Blend Modes found in Photoshop. Photoshop has some of the basic operations (addition and multiplication are there) but has a lot of other interesting operations to perform with colors. Most of the time these are not very complex operations, but it is uncommon to use them in shaders. The math behind them is well documented on the internet however, visit the following links if you would like to know more:
http://dunnbypaul.net/blends/ (very good reference!)
http://www.nathanm.com/photoshop-blending-math/
http://www.ziggyware.com/readarticle.php?article_id=228
Saturation/Desaturation
Because of the inherent nature of the RGB model, some color operations that you might be used to from Photoshop, are not easily possible. Hue shifts and saturation adjustments for example. Hue shifts are pretty much impossible without converting RGB values to HSV (Hue Saturation Value) color model, but saturation adjustments can be done via a few calculations. This part is a bit more advanced than the previous parts, but also deserves it’s place here.
There are two methods for calculating the desaturated value of a color, something that you need to do even if you want to increase the saturation instead of decreasing it. The first method is to just average the RGB values by using the formula (R+G+B)/3, resulting in a single scalar that represents the grayscale value.
A more correct way, is to use official luminance weights when calculating the average. The reason for this is that each channel should not contribute equally to the final greyscale luminace values. The green channel generally has the least contrast, the blue channel the most (you can check this by looking at separate channels of images in Photoshop). By FCC standard, these luminance weights are determined to be RGB(0.299,0.587,0.114). Note that these values add together to 1,0 exactly. The formula when using these weights is the following: (R*0.299 + G*0.587 + B*0.114). You can also use a Dot product of these two vectors to obtain the exact same result (with less typing).
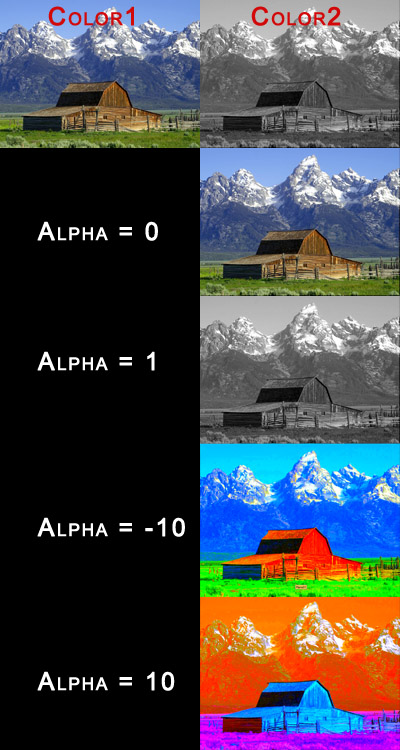
To increase saturation you use an alpha blending function which blends two colors together based on an alpha (blend) value. The function is the following:
Final pixel = alpha * ( color1 ) + (1.0-alpha) * (color 2)
This function is also called a Linear Interpolation or “Lerp”.
If color1 is the normal color and color2 is the desaturated color, you can increase saturation by using a negative value as alpha. If you use positive blend values you increase the saturation of the inverted colors. Note that if you switch color1 and 2 around, the blend values invert. As shown on the examples below.


Leave a Reply
Want to join the discussion?Feel free to contribute!