MaxScript Render To Texture with Projection

This is a blog post written from utter frustration. I’ve spent way too much time trying to get RTT in max working with projection, and finally found the issue that was stopping everything.

The problem is that I kept getting useless bake results: a (red) wireframe, and not a proper bake!
I’d checked the help dozens of times, trawled all the forums,etc… Nothing helped.


Now after rebuilding the code again, I found the issue:

the INodeBakeProperties have almost nothing in the way of proper default settings. You have to explicitly set a few things, if you don’t, it doesn’t work without any explanation why.

Take the following sample code:

--set up bake properties

bp = obj.INodeBakeProperties
bp.bakeEnabled = true
bp.bakeChannel = 1
bp.nDilations = 1

This is the key piece of code. If you don’t set bakeEnabled, it won’t bake. Easily overlooked. Bakechannel I’m not sure of the default, but you most probably need to set this explicitely. nDilations was my problem: this is the “edge padding” value: not explicitely setting it results in useless bakes! There is not a single warning on this in the Max help anywhere!

bp.removeAllBakeElements() --clear all to be safe and clean
dbe = DiffuseMap()
dbe.enabled = true
dbe.outputSzX = 128
dbe.outputSzY = 128

dbe.filenameUnique = false
dbe.elementname = "test"
dbe.filename = "C:\\"
dbe.filetype = "test.tga"

bp.addBakeElement dbe

For completion’s sake, here’s the rest of the essential code. The Bake elements have VERY generic class names such as “DiffuseMap”. They have to be enabled explicitely again.
The filename and filetype properties of the bake element are again very important: failure to set these and your bake element will not be able to create a bitmap. You’ll get a non-descriptive “Error Creating Bitmap” message. It doesn’t actually save them to that location though…
Also, very important to note: Edgepadding, or the ndilations value, is not applied when you set just “.tga” as filetype. If you set “filename.tga” it will apply them. The actual purpose of filetype vs filename is very vague and unclear.

Hopefully that will help out anyone who’s running into this same issue!

Vertex Blending Snow

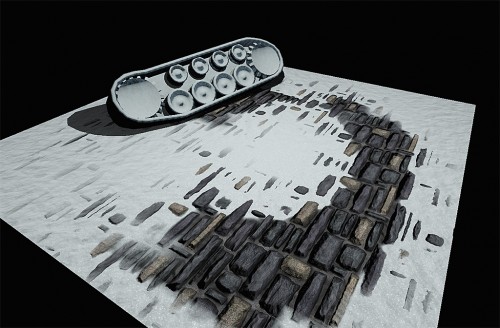
Due to an ongoing thread at the Polycount boards about the snow and ice of Uncharted 2, I replicated Paul Greveson aka MoP’s vertex blending material in Unreal.

This is my result:

Snowblends

The tank tracks are another type of blend, this one’s about the snow on the ground.

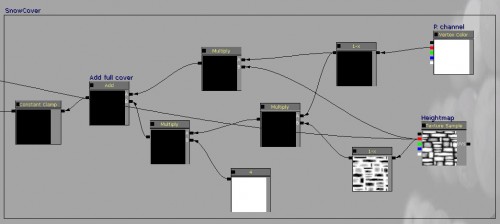
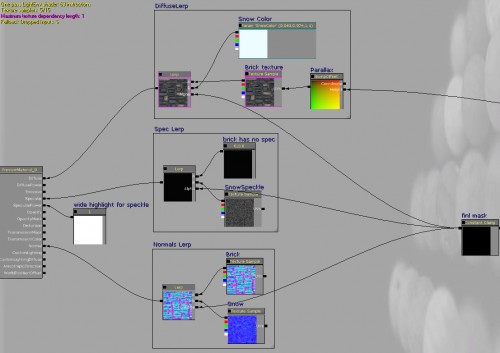
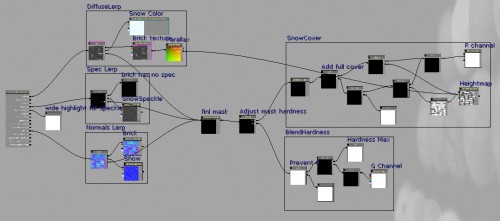
I was asked to post my node layout on my blog, so here goes:

vertexsnow001

The base mask for snow coverage is calculated by using the Red vertex color channel (you can easily paint onto one channel only in UDK, great feature!) and a heightmap. These are combined together to create a transition effect with the heightmap, where the vertexcolors fade out. Clamped at the end to prevent extreme values, just for safety.

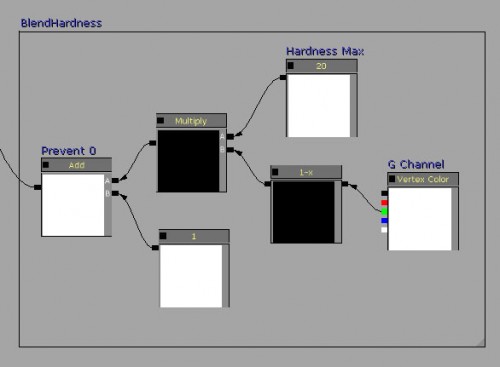
vertexsnow002

Using the Green vertex channel, we calculate a varying number for the mask’s hardness. 20 is the ceiling value, a 1 is added to prevent powering to 0 (bad). The invert on the vertex color is just to make sure the default value is hard (default vertex color is 1,1,1,1).

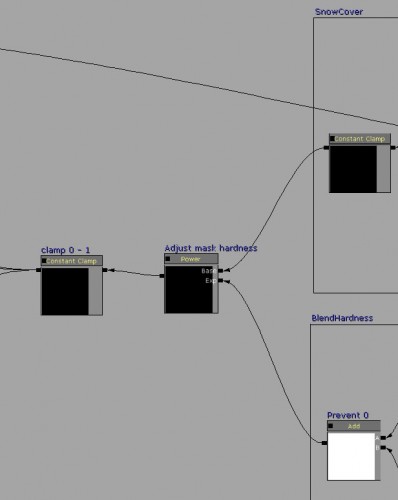
vertexsnow003

Both groups are combined by powering the raw mask to the hardness value, adjusting the contrast. Clamped for safety, though technically not necessary since we’re only powering a value of max 1to20,resulting in a  1 anyway.

vertexsnow004

The mask is used on 3 LinearInteroplate nodes, to blend between snow and non-snow diffuse, spec and normals. Since I had the heightmap anyway, I just used it for a quick parallax effect on the diffuse (I should apply it to normals as well…).

vertexsnow005

Total material. Nothing too complex, only 63 instructions which really isn’t expensive.

I recommend doing this in UDK only, since painting vertexcolors is incredibly easy there.

Normal baking and 3DS Max Tangent basis

During my Skorpion SMG project, I did a lot of normalmap baking. The baking itself really is the most tedious process for me, reaally slows me down a lot, even compared to UV’ing which a lot of people find horrible (I think it’s quite easy if you have TexTools and Unwrap Tools).
Every cage needs an hour of tweaking in my case (I group things into 4-5 big objects) and then still requires overpainting and fixing of normalmaps in Photoshop. I did find out a few things while baking in Max and xNormal:

  • Max uses an incorrect tangent basis to compute the normalmaps from. This results in the maps not working 100% correctly when viewed realtime with a shader. They do look ok when rendered, but that’s pretty useless for a game-artist.
  • xNormal does use the correct tangent basis, but is a bit tricky to set up. Biggest letdown was the lack of supersampling in xNormal, which leads to artifacts on baked maps. Max has no issue due to samplers like 2.5 Star or Hammersley. Santiago from xNormal did tell me he’s going to add supersampling in the next release!

In conclusin: big ups for Santiago, he’s areally great guy and it’s not the first time he’s been really helpfull and responsive to me. On the other side, boo on Autodesk for not fixing this issue for … years!

Camouflage Textures

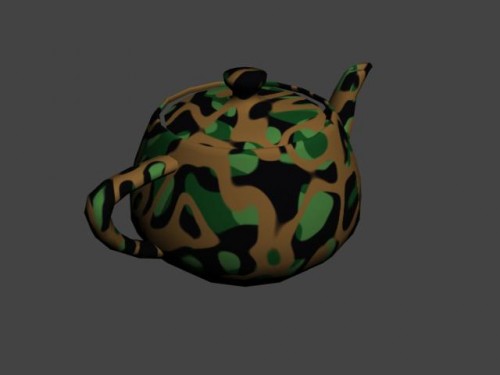
I was talking to 3DRobbo a few days ago, about his Mazda RX7 model that he wants to texture with camouflage. The issue of painting across seams came up and I remembered something from my Internship. The technical artists used a 3DS Max procedural material, a plugin from Blur Studios, that required no UV mapping. He then rendered that material to texture via Max’s Render To Texture interface. A very smart way of handling things, saves you the agony of having to paint across seams consistently. Definitely recommended for any artist that wants to texture camouflage.

For the sake of illustrating things, here’s a test from Rob:

camo_test_defaults_01

The Blur plugins can be found here:

http://splutterfish.com/sf/WebContent/DownloadTools